I Spent $200 Transforming My Ugly Backyard. Here Is Exactly What I Did.
A real budget backyard makeover with a full cost breakdown. No contractor needed.
Let me be upfront with you: my backyard was an embarrassment. Patchy dead grass, a cracked plastic chair no one sat in, a hose coiled in the corner like it gave up, and a pile of old flower pots I never got around to throwing away. Every summer I told myself I would fix it. Every summer I did nothing.
Read also:
- 12 Small Backyard Clever Layouts Ideas
- 20 Cozy Backyard Deck Ideas That Feel Warm and Inviting
- 28 Backyard Playground Ideas for Kids That Make Outdoor Play Unforgettable
Then last April, I gave myself a $200 hard limit and three weekends. What came out the other side genuinely shocked me, and more importantly, it shocked every person who visited after.
This post is the full breakdown: what I bought, what I did, what it cost, and what I would do differently. No fluff, no sponsored products. Just exactly how I turned a dead zone into a space I actually love spending time in.
Total spent: $194. Time invested: 3 weekends. Contractor hired: zero.
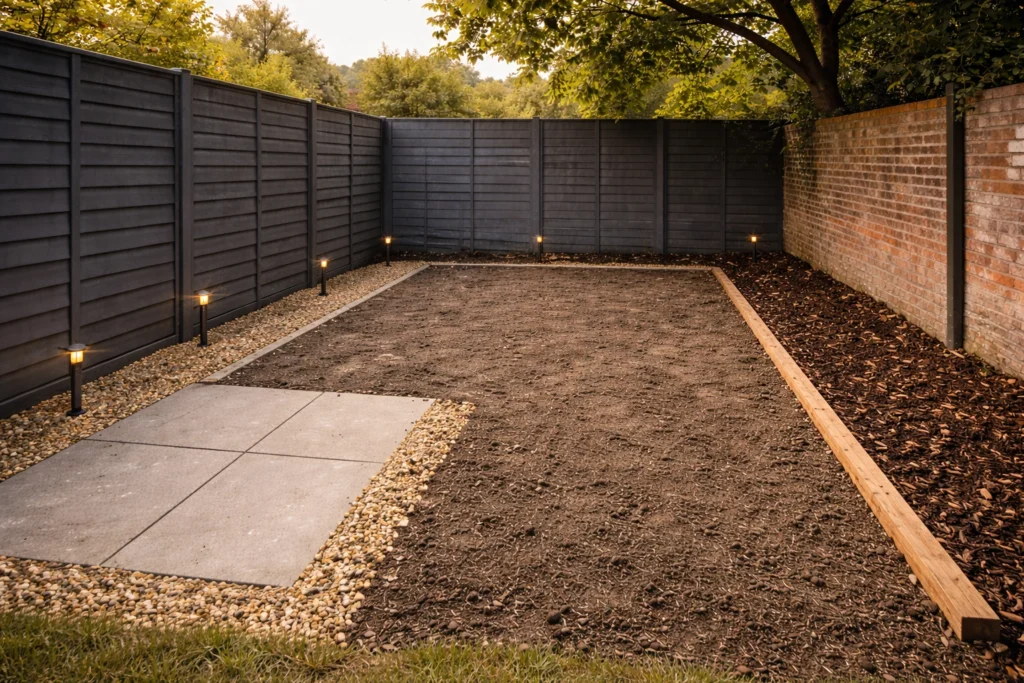
Week 1: Clearing the mess and setting the foundation ($0)
The first weekend cost me nothing except time, and it made the biggest visual difference of all three weekends. I pulled everything out of the backyard: every pot, every broken item, every piece of scrap wood I had been saving. I filled two trash bags and made one trip to the donation center.
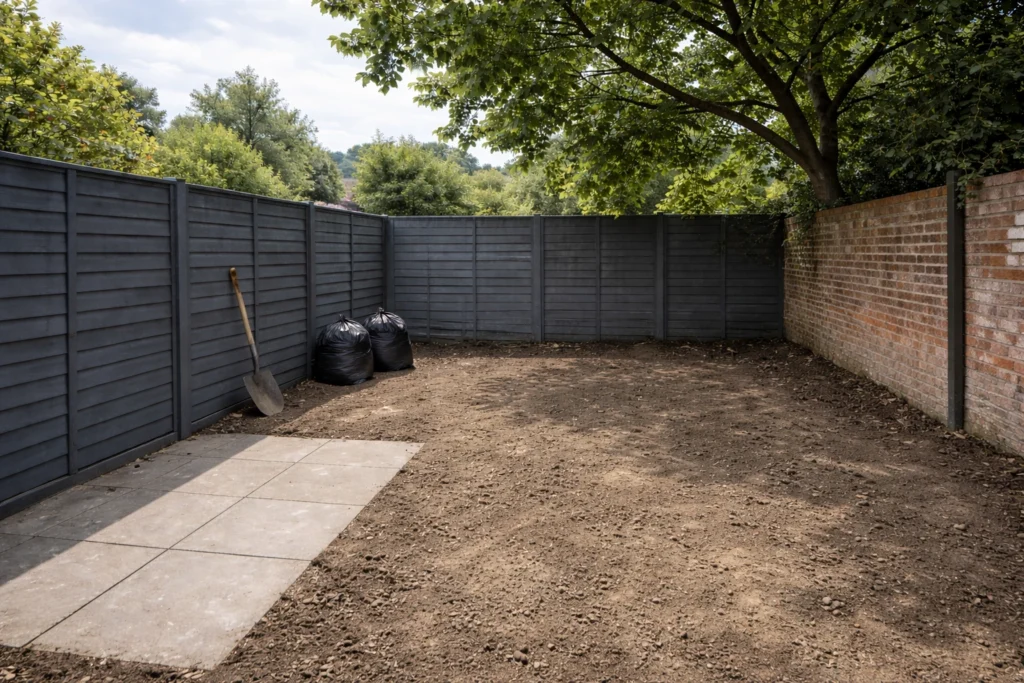
Then I tackled the dead grass. Instead of trying to revive it, I made a decision that changed everything. I stopped fighting the grass and decided to cover it. I borrowed a technique from a YouTube video and spent Saturday afternoon using a flat spade to strip the dead patches around the patio perimeter. No rental fee, just elbow grease.
By Sunday evening, I had a clean, bare canvas. The yard looked worse for about 48 hours, but it was the most important step in the whole project. You cannot layer good design on top of clutter and expect results.
Lesson learned: 80% of a backyard transformation is subtraction, not addition. Remove first, then decide what to add.
Week 2: The ground cover and the focal point ($112 spent)
This was the spending weekend, and I want to give you the exact breakdown because this is where most budget makeovers either succeed or fall apart.
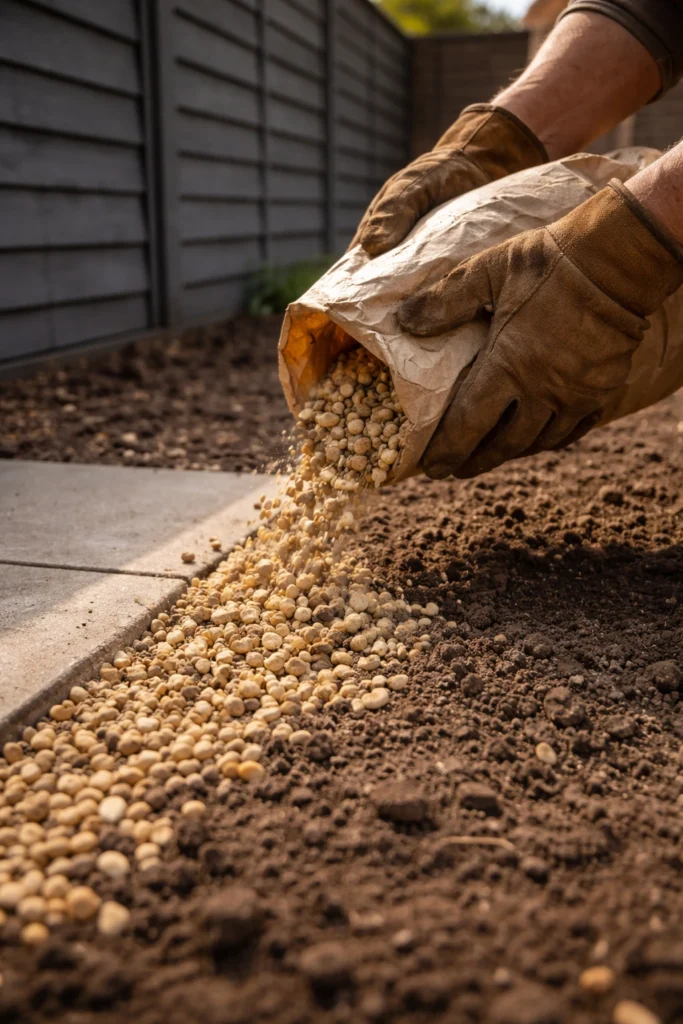
The single best purchase I made was gravel. I bought four 50-pound bags of pea gravel from my local home improvement store at $6 each. That is $24 total, and it covered the stripped perimeter area around my small patio completely. Gravel does something no paint or furniture can do. It immediately gives a yard a designed feeling. It defines zones. It makes the space look intentional.
Next, I bought two bags of mulch at $5 each to cover the side garden bed where I had ripped out the dead shrubs. Dark mulch against bare soil looks like neglect. Dark mulch against a cleared, edged bed looks like proper landscaping.
The remaining $78 went to four things:
- A 48-pack of solar stake lights from the discount section, at $18. These went along the gravel path and the fence line.
- Two bags of wildflower seed mix for $12. I scattered these in the back corner where nothing grew and stopped trying to control it.
- One large terracotta pot and two small ones, all three for $22 from a thrift store. I spray-painted the small ones matte black with a $6 can I already owned.
- A cedar wood beam from the offcuts bin for $20. This became the edging between gravel and mulch, giving a clean separation line.
By Sunday of week two, the yard had a structure it had never had before. The gravel area defined where you would sit. The mulch bed defined where plants lived. The solar lights defined the path. Your eye knew where to go.
Week 3: Furniture, plants, and the finishing touches ($82 spent)
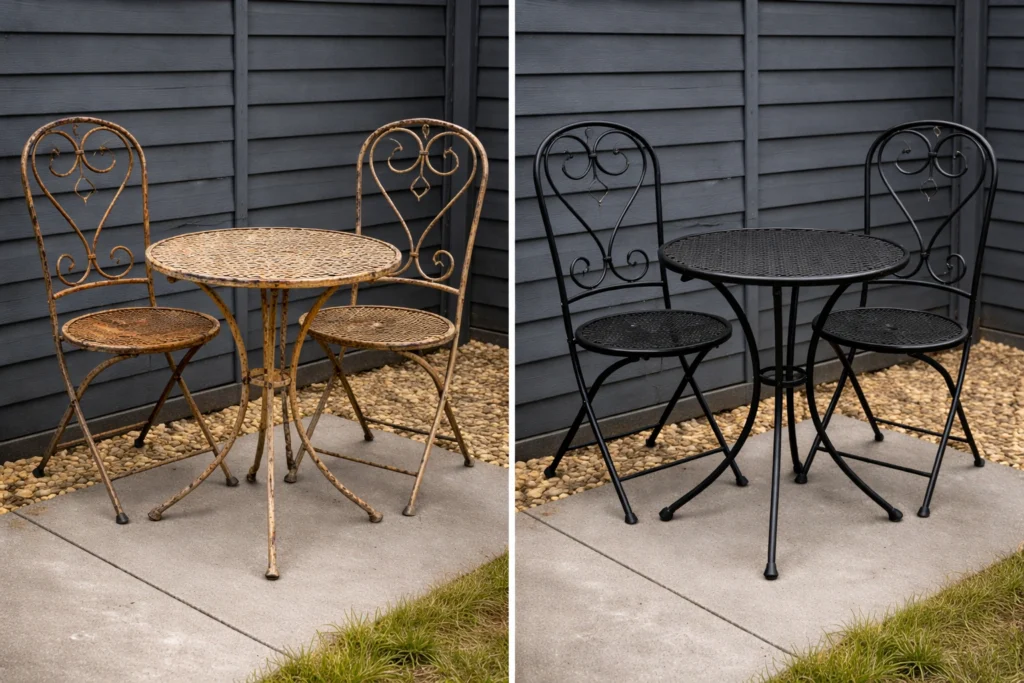
I want to be honest about furniture: you cannot buy outdoor furniture for $82. What you can do is find it. I spent two evenings scrolling Facebook Marketplace and found a small wrought iron bistro table with two chairs for $35. One chair had a wobbly leg I fixed in five minutes with a wrench. I spray-painted both chairs and the table with the leftover matte black spray paint, and they looked brand new.
That left $47 for plants. This is where I made my smartest decision of the whole project. I went to the garden centre on a Sunday afternoon, when they mark down anything that looks slightly stressed. I came home with:
- Two lavender plants at $4 each. Hardy, fragrant, and they come back every year.
- One ornamental grass for $6. This went in the big terracotta pot and immediately gave the patio a designed anchor point.
- Three trailing petunias in a mixed flat for $9. These went in the two small black pots flanking the bistro table.
- A climbing vine cutting my neighbour gave me for free. This is now slowly working its way up the fence.
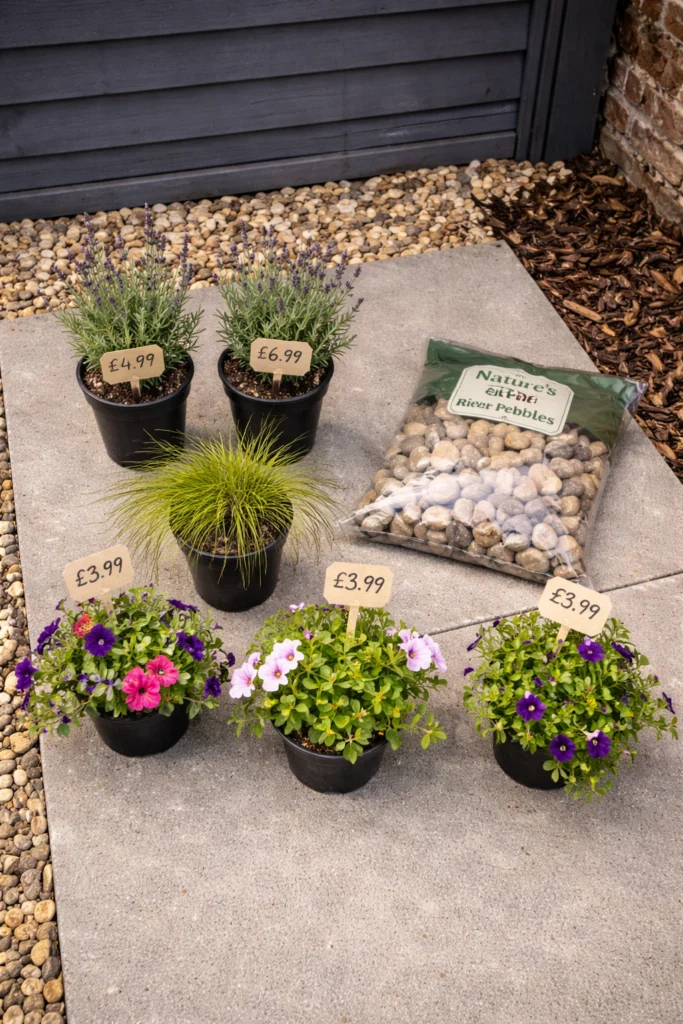
The final $24 went to two things: a $14 outdoor rug found in the clearance section (slightly too small, which actually works perfectly under a bistro table) and a $10 bag of decorative river rocks to border the base of the terracotta pot.
The outdoor rug deserves its own mention. Nothing makes an outdoor seating area feel like a real room more than a rug underneath it. It anchors the furniture and tricks the eye into seeing a defined living space.
The full cost breakdown
Here is every dollar, accounted for:
- Pea gravel, 4 bags at $6 each: $24
- Mulch, 2 bags at $5 each: $10
- Solar stake lights: $18
- Wildflower seed mix: $12
- Terracotta pots from thrift store: $22
- Cedar edging beam from offcuts bin: $20
- Bistro table and chairs from Facebook Marketplace: $35
- Matte black spray paint: $6
- Lavender plants, 2: $8
- Ornamental grass: $6
- Trailing petunias: $9
- Outdoor rug from clearance: $14
- River rocks: $10
- Total: $194
What I would do differently
Start with the solar lights earlier. I installed them on week three, but the moment I turned them on at dusk, they transformed the yard in a way no daytime change had. If I were doing this again, I would install them at the end of week one just to see the space with evening light and plan everything else around that mood.
Do not buy plants first. I nearly reversed my order and went plant shopping before I sorted the ground cover and furniture. Plants die or move. Structural elements like gravel, edging, and furniture placement dictate everything. Always anchor before you decorate.
Thrift stores and Facebook Marketplace are not backup plans. They are the plan. The bistro set I found for $35 would have cost $180 new. The pots I found for $22 would have been $55 at a garden centre. The whole project only worked financially because I treated secondhand as a first choice, not a compromise.
The one thing that made the biggest difference
If someone asked me to name the single change that had the most impact per dollar, I would say the gravel without hesitation. Four bags, $24, and it instantly made the yard look designed rather than neglected. It defined zones. It suppressed the weeds. It made every other element look more deliberate by comparison.
People always assume a backyard transformation requires a budget with a comma in it. Mine had three digits and came in six dollars under. What it actually required was a plan, a weekend of hard editing, and the willingness to shop sideways: thrift stores, clearance racks, the offcuts bin, Facebook Marketplace, and a generous neighbour with a climbing vine.
The yard is not perfect. There are still things on my list. But it is a space I choose to spend time in now, which is more than I could have said before any of this. And that, honestly, is the whole point.
Save this post to keep the full cost breakdown for your own backyard project.